Android Apps and Games Development
Android is the most widely used mobile operating system in the world. Millions of people use Android phones and tablets every day, and this makes Android app and game development a great skill to learn. Whether you want to build a simple utility app, a business tool, or an exciting game, Android gives you everything you need to bring your idea to life.
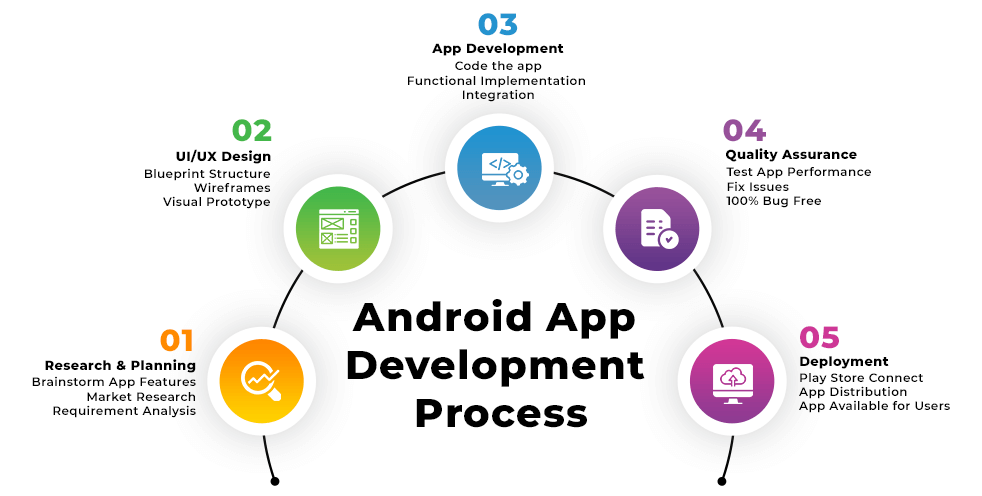
This guide explains, in simple language, everything about Android app and game development. We will cover how to set up your development environment, how to create apps and games step by step, how to test them, and finally how to publish your work on the Google Play Store. By the end of this guide, you will have a clear picture of the whole journey from an idea to a published app.
What is Android App Development?
Android app development means creating software applications that run on devices using the Android operating system, such as smartphones, tablets, smart TVs, and even smartwatches. These apps can be anything: a calculator, a to-do list, a social media platform, an online shopping app, or a photo editor.
Android apps are usually built using programming languages like Kotlin or Java, along with tools provided by Google. The final product is a file called an APK or an AAB (Android App Bundle), which can be installed on Android devices or uploaded to the Play Store for others to download.
What is Android Game Development?
Android game development is a specialized branch of app development that focuses on building interactive entertainment experiences. Games are usually more complex than regular apps because they involve graphics, animations, physics, sound effects, and sometimes multiplayer features.
Games can be built using the same tools as regular apps, but most developers prefer using game engines like Unity or Godot because these tools make it easier to handle graphics, movement, and game logic without writing everything from scratch.
Why Choose Android Development?
There are several reasons why Android development is popular among beginners and professionals alike.
Huge User Base
Android has billions of active users across the world. This means your app or game has the potential to reach a massive audience, regardless of which country you live in.
Low Cost to Start
Unlike some other platforms, you don’t need expensive hardware to start developing Android apps. A basic laptop or desktop computer is enough to get started.
Flexible Publishing
Google Play Store allows developers to publish apps with a one-time registration fee, unlike some other platforms that have stricter rules or higher costs.
Strong Community Support
Because Android development has been around for many years, there are countless tutorials, forums, and communities where beginners can get help whenever they are stuck.
Prerequisites Before You Start
Before diving into development, it helps to understand a few basic things.
Basic Programming Knowledge
You don’t need to be an expert programmer, but having a basic understanding of programming concepts like variables, loops, functions, and conditions will make the learning process much smoother.
Choosing a Programming Language
For app development, Kotlin is now the preferred language recommended by Google, though Java is still widely used and supported. For game development, you might use C# if you choose Unity, or GDScript if you choose Godot.
A Computer That Meets Requirements
You will need a computer with a reasonable amount of RAM (8GB minimum, 16GB recommended), a decent processor, and enough storage space, since development tools and emulators can take up significant space.
Setting Up Your Development Environment for Apps
Now let’s go through the step-by-step setup process for building Android apps.
Step 1: Install Android Studio
Android Studio is the official tool provided by Google for building Android apps. It includes everything you need: a code editor, design tools, an emulator to test your app, and debugging tools.
To install it, visit the official Android developer website, download the version suited for your operating system (Windows, macOS, or Linux), and run the installer. The setup wizard will guide you through installing the necessary components, including the Android SDK (Software Development Kit).
Step 2: Install the Android SDK
The Android SDK contains libraries and tools that allow your code to interact with Android devices. Android Studio usually installs a default SDK version during setup, but you can install additional versions depending on which Android versions you want to support.
Step 3: Set Up an Emulator or Connect a Real Device
To test your app, you need either a virtual device (emulator) or a real Android phone connected to your computer. Android Studio includes a built-in emulator manager where you can create virtual devices of different screen sizes and Android versions. Alternatively, you can enable “Developer Options” and “USB Debugging” on a real phone and connect it via USB cable.
Step 4: Create Your First Project
Once everything is installed, open Android Studio and create a new project. You will be asked to choose a template (like Empty Activity), set your project name, choose the programming language (Kotlin or Java), and select the minimum Android version your app should support.
Understanding the Structure of an Android App Project
When you create a new project, Android Studio generates several folders and files automatically. Understanding these helps you navigate your project easily.
The Manifest File
The AndroidManifest.xml file describes essential information about your app, such as its name, permissions it requires (like camera or internet access), and the main activity that launches when the app opens.
Activities and Layouts
An “Activity” represents a single screen in your app. Each activity usually has a corresponding layout file written in XML, which defines how the screen looks, including buttons, text fields, and images.
Java or Kotlin Code Files
These files contain the actual logic of your app. This is where you write code to respond to button clicks, fetch data from the internet, save information, and control how your app behaves.
Resources Folder
This folder stores images, icons, strings (text), colors, and styles used throughout your app. Keeping these separate from your code makes it easier to update the appearance of your app without touching the logic.